Published:2026-07-23
Keywords:Nano Banana Pro, local edit, multi-image fusion, nanobanana prompts, character consistency, Nano Banana official website
Many creators get stuck on the same problem: you already have a finished image you like, but you need to “change only the background,” “swap only the fabric texture,” or “merge two assets into one storyboard frame” — traditional retouching means cutouts, relighting, perspective fixes, and half a day gone.
Among the capabilities featured on the Nano Banana official website, local edit and multi-image fusion are built for exactly these needs. My workflow: use Nano Banana standard for creative trials, switch to Nano Banana Pro (Google Gemini 3 Pro Image) when you need precise face, label, and lighting logic preserved. Once the flow is set, “edit locally, fuse multiple images” averages 10–20 minutes to a deliverable preview.
This is a brand-new local edit & multi-image fusion deep-dive (different from past poster text layout, e-commerce lifestyle, social batch, portrait fashion, or character turnaround topics). Full prep checklist, four-step workflow, three copy-ready prompt templates, lock-in tips, three case breakdowns, and a pitfalls table.
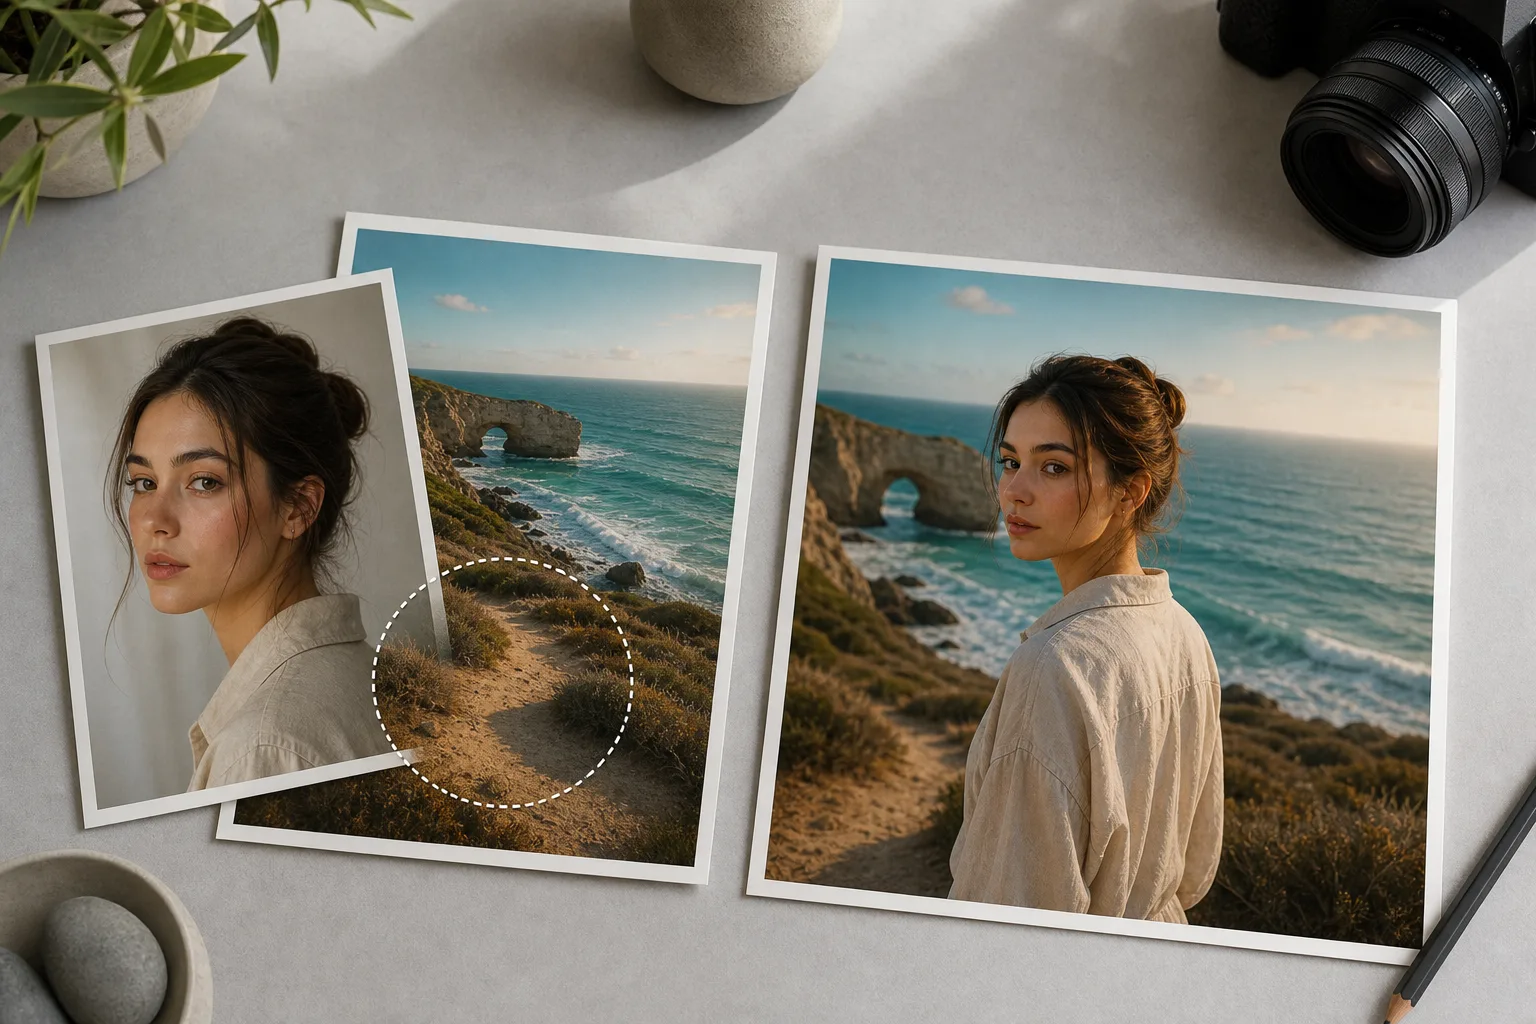
1. Why Nano Banana Pro for local edit & multi-image fusion?
Nano Banana standard is great for quick “what if we change this?” tests; when you need to preserve subject identity, readable labels, and coherent lighting, Nano Banana Pro is more reliable:
| Capability | Traditional PS cutout composite | Nano Banana Pro |
|---|---|---|
| Local intent understanding | Manual mask brushing | Natural language: “change only background / swap only material” |
| Character / product consistency | Faces and labels easily drift | Reference image + preserve instructions keep features and packaging stable |
| Multi-image fusion | Layer stacking, perspective misalignment | Upload 2+ references, describe compositing relationship |
| Lighting match | Manual curves and shadows | Infers contact shadows and environment reflections |
| Revision speed | Every change means redoing masks | Conversational: “soften fusion edge, keep Image 1 face” |
The core difference: Nano Banana Pro understands what to change and what to preserve, then renders — not a random full redraw.
2. Asset prep checklist (what decides whether fusion looks fake)
Before opening Nano Banana or Nano Banana Pro, prepare:
- Main image (Image 1, required): Subject to preserve (portrait / product / scene), clear and with single-direction lighting
- Reference image (Image 2, as needed): New background, new garment material, or second subject to fuse
- Optional Image 3: Style anchor (color tone, film look, brand poster mood)
- Change list (required): One sentence stating what to change / not change, e.g. “swap background to café only, preserve face and hairstyle 100%”
- Output specs: 1:1 social, 3:4 cover, 16:9 banner
- Negative constraints: No watermark, no garbled text, no extra limbs, no floating look
Tip: Learn capabilities on the Nano Banana official website, then upload in the web app. White-background products and clean portraits are easiest for local edits; the messier the background, the more you must stress “edit only the designated area” in your prompt.
3. Four-step workflow (upload to final delivery)
Step 1: Enter Nano Banana Pro and upload references
- Open Nano Banana web app
- Select the Nano Banana Pro model
- Upload Image 1 (main subject); add Image 2 (and optional Image 3) when fusing
Step 2: Choose a task template
- Template A: Local background / scene swap (subject locked)
- Template B: Local material / garment / prop swap
- Template C: Multi-image fusion storyboard / same-frame composite
Step 3: Preview QA — four checks
Verify:
- Regions you did not ask to change really stayed the same (face, logo, proportions)
- New and old regions share the same light direction
- Fusion edges are not harsh or “sticker-like”
- No extra fingers, duplicate limbs, or garbled text
Step 4: Natural-language tweaks + 4K export
Common instructions:
- “Increase background blur only; keep face sharpness unchanged”
- “Shrink Image 2 product 10%, place on table right, add contact shadow”
- “Soften fusion edges; unify color temperature to warm light”
When satisfied, output 4K for ad assets, product detail pages, or serialized storyboard frames.
4. Prompt Template A: Local background swap (copy-ready)
Best for: Portrait scene swaps, product display environments, ID-level subject lock
How to use: Upload Image 1 as the subject; replace【新场景描述】with your real scene description.
Edit mode: LOCAL EDIT only. Use Image 1 as the exact subject to preserve.

Preserve 100%: face identity, hairstyle, body proportions, clothing (unless told otherwise), product label text, and camera perspective of the subject.

Change only: background / environment to 【新场景描述】.

Lighting: Match new environment light direction to soft contact shadow under subject; no cutout look; integrate subject into scene with realistic edge blending.

Style: Photoreal, Nano Banana Pro precision edit, commercial ready.

Negative constraints: do not redesign face, no warped logo, no extra limbs, no watermark, no global restyle of the subject.

Output: same aspect as Image 1 or 3:4, 4K, Nano Banana Pro local edit.
Usage notes
- Upload a clear main image in Nano Banana Pro
- Replace
【新场景描述】, e.g. “rainy Tokyo street, warm shop-window glow” - Generate 1K preview to check face and edges, then output 4K
5. Prompt Template B: Local material / garment swap (copy-ready)
Best for: Change fabric, packaging material, or furniture surface — subject pose unchanged
Highlights: Explicitly targets “change only the material region” — replace【目标区域】with【新材质描述】in the prompt.
Edit mode: LOCAL MATERIAL / GARMENT SWAP on Image 1.

Preserve 100%: pose, face (if any), product silhouette, brand logo placement and legibility.

Replace only: 【目标区域】 material/appearance with 【新材质描述】 (e.g. matte black metal, linen fabric, frosted glass).

Keep folds, seams, and lighting consistent with original photo; update specular highlights to match new material.

Style: Precise Nano Banana Pro retouch, catalog-quality, no full-body redesign.

Negative constraints: no color bleed into untouched areas, no melted text, no watermark.

Output: 1:1 or 4:5, 4K.
6. Prompt Template C: Multi-image fusion storyboard (copy-ready)
Best for: Character + product same frame, dual roles in one scene, split storyboard layout
How to use: Image 1 = character / main product; Image 2 = second element or scene board. Fill【构图说明】and【一句话剧情】for the frame.
Fusion mode: MULTI-IMAGE COMPOSITE using Image 1 and Image 2 (optional Image 3 as style lock).

Identity lock: Image 1 subject identity preserved; Image 2 object/person preserved at correct scale.

Composition: 【构图说明】 (e.g. character left, product on table right, shared kitchen scene).

Physics: unified light from left window, shared contact shadows, consistent color temperature, seamless blend — Nano Banana Pro multi-image fusion.

Story beat: 【一句话剧情】 for a single storyboard frame.

Negative constraints: no duplicate faces, no floating objects, no conflicting shadows, no watermark, no garbled text.

Output: 16:9 storyboard frame or 3:4 cover, 4K.
7. Lighting, edges & identity lock tips (advanced)
Local edit and multi-image fusion most often look “obviously fake” at three points: edges, shadows, identity. Five rules:
- State scope in the first sentence: Start with
LOCAL EDIT onlyorMULTI-IMAGE FUSION - Make the preserve list specific: “face + hairstyle + label” beats vague “keep consistent”
- One primary light direction only: Left window light — do not also add right-side flash
- Scale anchors: When fusing, write “product same height as coffee cup” to prevent giant-object drift
- Change one category at a time: Swap background first, confirm, then swap material — avoid conflicting instructions
8. Three real case breakdowns
Case 1: Studio portrait → café lifestyle image
- Input: White-background studio portrait (Image 1)
- Template: Template A, new scene = warm café
- Result: Face locked, background blends naturally — good for brand seeding
- Use: Social cover, official website case wall
Case 2: Water cup product → frosted glass material
- Input: White-background cup shot (Image 1)
- Template: Template B, target region = cup body material
- Result: Label still readable, highlights updated for new material
- Use: E-commerce main image A/B testing
Case 3: Character + product → same-frame storyboard
- Input: Character Image 1 + product Image 2
- Template: Template C, kitchen countertop same-frame layout
- Result: Reasonable scale, unified shadows — works as storyboard frame 1
- Use: Ad storyboard, narrative hero on product detail page
9. Common mistakes & how to avoid them
| Symptom | Cause | Fix |
|---|---|---|
| Entire face redrawn | Did not stress LOCAL + preserve face | Open with LOCAL EDIT; list preserve items |
| Fusion looks like a sticker | Missing contact shadow / mismatched color temperature | Add soft contact shadow + unified CCT |
| Logo / label blurred | Did not require label legibility | Add preserve label text 100% readable |
| Proportion off | No size anchor | Write relative size vs cup / hand / table |
| Too many changes at once fail | Conflicting instructions | Split into two steps: background first, then material |
10. Nano Banana standard vs Nano Banana Pro — which to choose?
- Nano Banana (standard): Try “which background looks best,” internal brainstorms, drafts where identity precision is less critical
- Nano Banana Pro: Commercial local retouching, multi-image fusion finals, 4K delivery with label / face lock
Suggested path: explore direction on standard → refine and fuse on Nano Banana Pro. Product details and entry point: Nano Banana official website.
11. Quick start in three steps
- Write what to change / not change → Upload Image 1 (+ Image 2) → Open Nano Banana Pro
- Copy the matching template → Replace scene / material / composition placeholders → 1K preview QA
- Conversational edge & lighting tweaks → 4K export for delivery
12. Final thought
Local edit is not “generate another similar image” — it is surgical editing: move what should move, keep what should stay. Multi-image fusion puts multiple assets under one set of physics and lighting rules. Nano Banana Pro wraps both into a natural-language workflow — you write the brief, it executes.
If you are still redoing work because “I only wanted a new background but the whole face drifted,” try Template A today. After one pass, you will better understand the controllable creation the Nano Banana official website emphasizes: less random luck, more finalized deliverables.